IOT Weather Kit for Pi

Learn how to program with python and interact with different sensors with the IOT Weather Kit for Pi. The kit contains all the necessary hardware and software to build your own indoor Air quality monitor with Carbon Dioxide, Total Volatile Organic Compounds, Pressure , Humidity and Temperature readings. Moreover, you will learn about all the basics of Raspberry Pi & Python programming
Knowing your kit
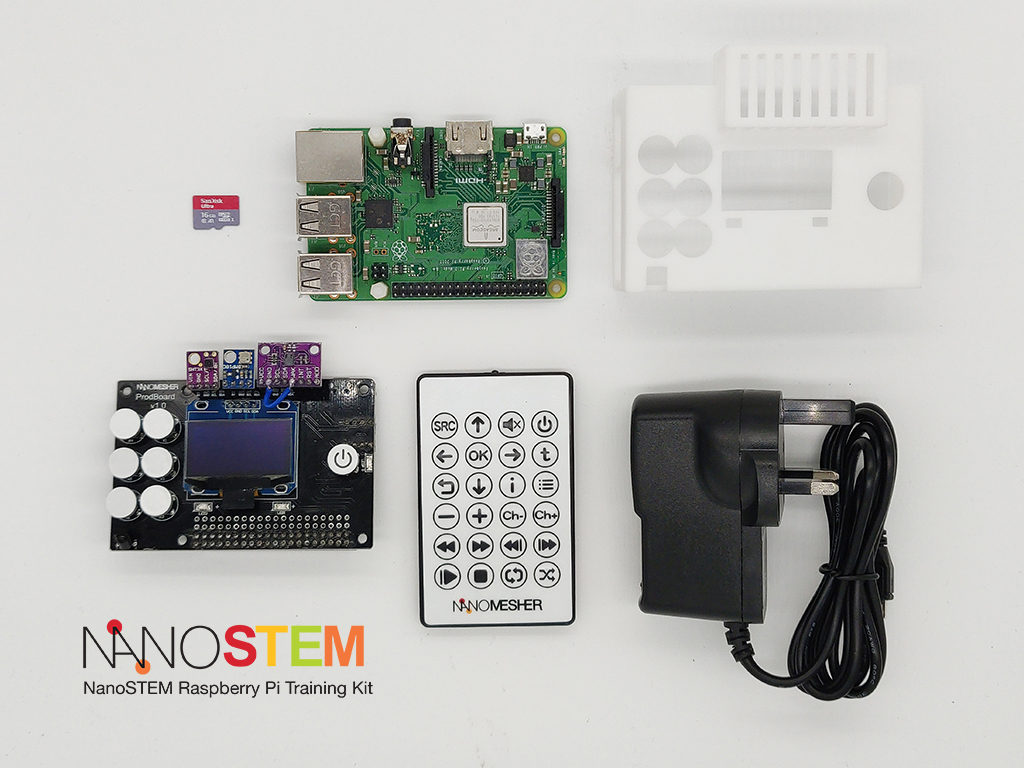
Your kit composed of
-
- Raspberry Pi 3 B+ and Power Adaptor
- 16GB microsd card – for running your operating system and software
- Nanomesher ProdBoard – add-on board for Raspberry Pi
- Weather Sensors
- Bosch BMP180 Pressure Sensor
- Pressure range: 300 … 1100hPa (+9000m … -500m relating to sea level)
- Fully Calibrated
- Sensirion SHT31 Humidity and Temperature Sensor
- Typical accuracy of +/- 2%RH and +/- 0.3°C
- Fully Calibrated
- AMS CCS811 Air quality Sensor
- Total Volatile Organic Compound (TVOC) sensing from 0 to 1,187 parts per billion
- eCO2 sensing from 400 to 8,192 parts per million
- Integrated MCU Onboard Processing
- Bosch BMP180 Pressure Sensor
- Optional 3D Printer Case. You may print your own by using this stl file
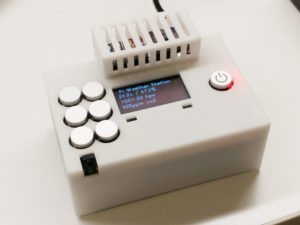
What is ProdBoard?
Nanomesher ProdBoard contains essential utilities hardware which helps you with your raspberry pi projects. It contains
- 6 x GPIO Buttons
- 2 x onboard LED
- 3 x i2C Ports for connecting to sensors such as temperature, humidity and pressure sensors
- 1.3″ High Contrast OLED display (128 x 96 resolution)
- Pi Switch for Raspberry Pi (It’s programmable with onboard Attiny85 using the same design as our first Kickstarter project delivered)
- Infrared Receiver with Remote Control included (LIRC compatible)
- Infrared Blaster (LIRC compatible)
- 8 Channel Dip switch to optionally turn off any buttons and LEDs, so the GPIO pins can be spared
- Reusable Raspberry Pi 40pin GPIO Pinout
Assembling your hardware
Software Installation
You can install the software via following ways:
- Method 1 – Pre-installed image
- Method 2 – Manual installation
Method 1 – Pre-installed Air Monitor Image
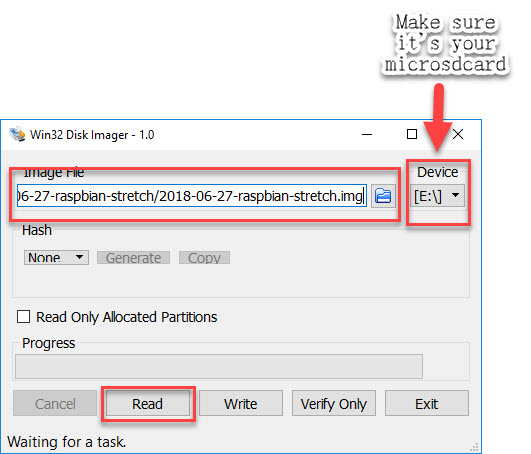
This pre-configured card image is based on RASPBIAN STRETCH LITE, but have all the libraries / tools required by ProdBoard preinstalled.
It to configured to auto start the PiAirMon utility. Just write the image, boot up your Pi and that’s it!
Download link: nanomesher_prodboard_airmon
Upzip and use utility such as Win32DiskImager to burn the img onto microsd card.
The installed library include:
- Nanomesher Power Switch
- https://github.com/nanomesher/Nanomesher_PiSwitch_Shutdown.git
- Nanomesher ProdBoard
- https://github.com/nanomesher/Nanomesher_ProdBoard.git
- LIRC libraries
- Luma.OLED Python Library
- Weather Sensors
- BMP180
- https://github.com/adafruit/Adafruit_Python_BMP.git
- SHT31
- https://github.com/ralf1070/Adafruit_Python_SHT31.git
- CCS811
- https://learn.adafruit.com/adafruit-ccs811-air-quality-sensor/raspberry-pi-wiring-test
- BMP180
Please note the image has SSH server enabled.
Method 2 – Manual installation on top of Raspbian
Raspbian Installation
- Download Raspbian Image from here
- Use Image writing such as Etcher or win32imager to write the image onto your sd card. Using win32imager as example:
- Unzip the Raspbian zip file
- Open win32imager, open the image and select the drive of your sdcard and press write
- Once it’s finished, you can eject your microsd card and insert into your Raspberry Pi
Installing the sample code
- Follow this comprehensive guide to install all the required libraries.
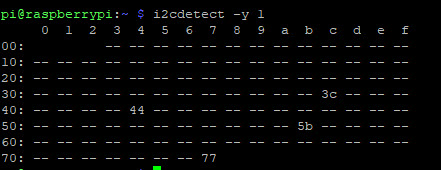
- Check if all sensors are display are installed properly
i2cdetect -y 1
This will scan all i2c devices, if you have all the sensors installed, you will see below. There are 4 devices (3 sensors module and OLED display)
- 0x44 – SHT31 temperature / humidity sensor
- 0x3C – OLED display
- 0x77 – BMP180 Barometric pressure sensor
- 0x5B – CCS811 VOC sensor if your sensor is blue or 0x5A – CCS811 VOC sensor if your sensor is purple
- Get the sample code
git clone https://github.com/nanomesher/Nanomesher_ProdBoard.git
- Test your first code
cd ~/Nanomesher_ProdBoard
python ledDemo.py
- Both LEDs should blink twice. Well done!

DisplayDemo – Sample for using the OLED Display
python DisplayDemo.py
The display should show the IP address of raspberry pi on the screen
SimpleButton – Sample for listening to button event
python SimpleButton.py
Press the top left button. You should see “Button Pressed” on the console
LIRCDemo – Samples for listening to infra remote
Before running the sample, please make sure LIRC has been properly setup. Instructions here.
python LIRCDemo.py
Press the buttons on the infrared control. The LED should light up accordingly.

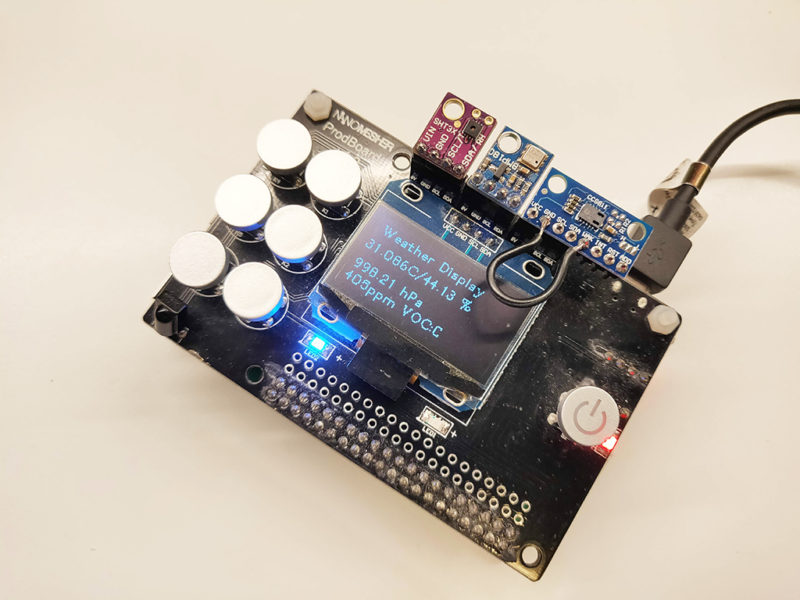
TempDisplay – Utility for display temperature, humidity, pressure, air quality
cd ~/Nanomesher_ProdBoard/WeatherExample
python TempDisplay.py
The data will be displayed on the OLED Display. Note that for the CCS811 Air quality sensor, it take around 20mins to warm up to output valid data (CO2 and VOC)
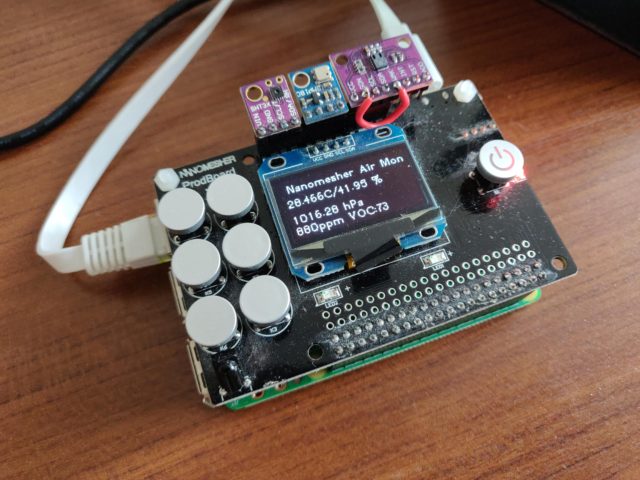
PiAirMon – Utility for display temperature, humidity, pressure, air quality , saving to a local sqlite database and pushing data to Adafruit IO cloud service.
Configuration
Configuration can be change by editing the AirMonitor.config.
SaveToDatabase = yes  # Whether to save to database
SaveToDatabaseIntervalSecond = 60   # Interval of saving to database
SendToAIO = no   # Whether to send data to Adafruit.IO
SendToAIOIntervalSecond = 60  # Interval of sending data to Adafruit.IO
CCS811 = yes  # If Air quality sensor is installed
SHT31 = yes  # If Temperature & Humidity quality sensor is installed
BMP180 = yes  # If Pressure sensor is installed
Display = sh1106  # Which screen is installed.
When using with IOT Kit Standard (which comes with Pi Switch Cap), change display to ssd1306:
Display = ssd1306
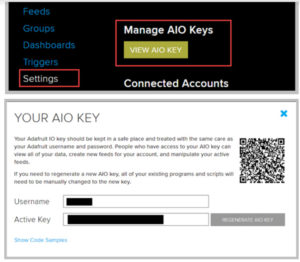
Before using this utility, Adafruit IO account needs to be registered.
- First of join, go to https://io.adafruit.com . Join Adafruit account and sign in
- To connect your device to adafruit io, note down the following connection details
- Your Adafruit username (AIO username)
- Your AIO Key – treat this like a password as this allow devices to publish data to your adafruit IO
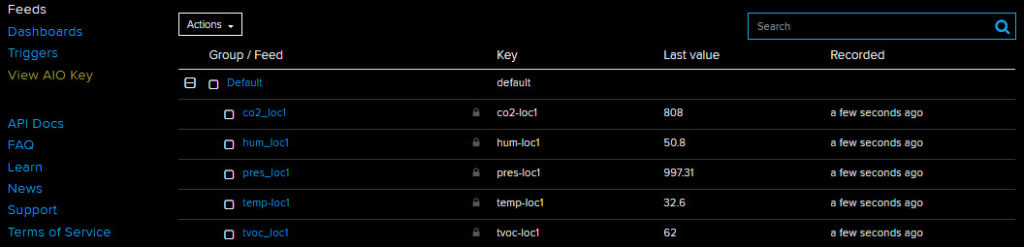
- In Adafruit IO, log into your account. Go to “Feeds” and Actions and Create a new feed called “temp-loc1”. Repeat the same and create more feeds called “hum-loc1″, “co2-loc1”, “pres-loc1” and “tvoc-loc1”
- ssh to your Pi
- Edit AirMonitor.config
cd ~/Nanomesher_ProdBoard/WeatherExample

nano AirMonitor.config
- Replace the aiokey with your own.
AIOKey = YOUR_ADAFRUIT_IO_KEY
- Run the utility
python PiAirMon.py
- If you seeing errors, please follow the Weather Section in here to make sure you install the dependency and settings. Make sure you reboot after.
- Data are saved into the sqlite database under the /database directory. sqlite3 utility can be used to view data.
The data will be displayed on the OLED Display, as well as . Note that for the CCS811 Air quality sensor, it take around 20mins to warm up to output valid data (CO2 and VOC)
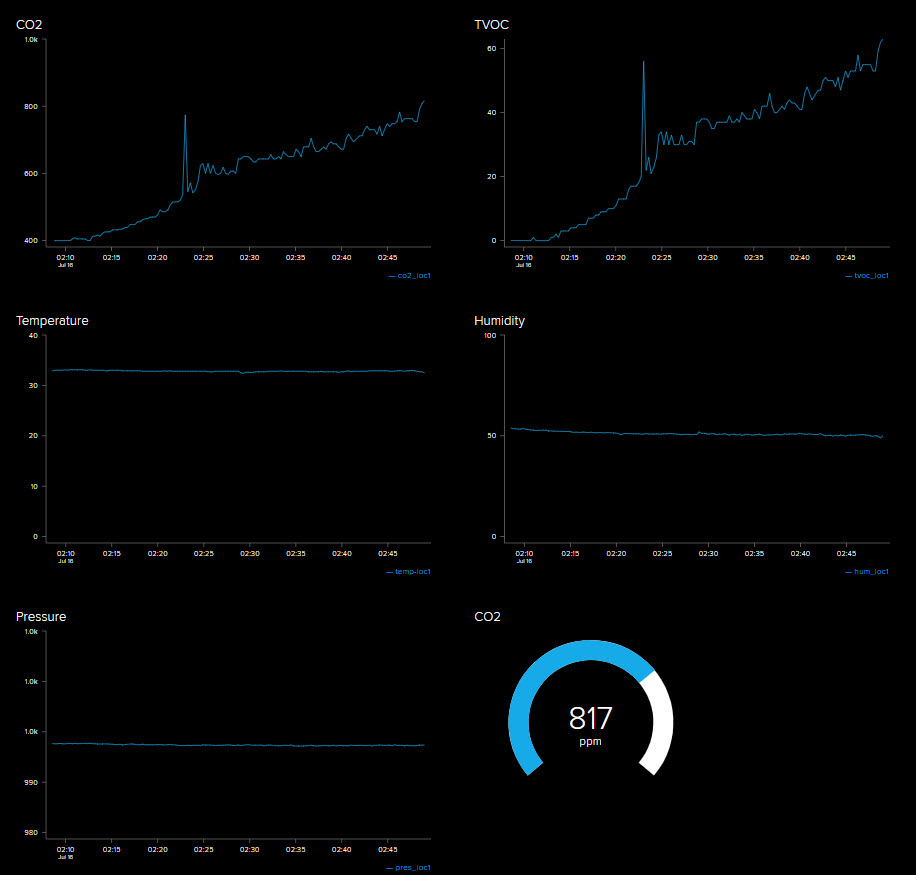
- In Adafruit IO, under feeds you will see your data are being sent from your Raspberry Pi to Adafruit IO
- You can also create your dashboard to visualize the data
Auto install PiAirMon as service
If you would like to install PiAirMon as an autostart service, follow below:
cd ~/Nanomesher_ProdBoard/WeatherExample
chmod 555 PiAirMon.py
sudo cp ~/Nanomesher_ProdBoard/service/nanomesher_piairmon.service /lib/systemd/system
sudo systemctl daemon-reload
sudo systemctl enable nanomesher_piairmon
sudo systemctl start nanomesher_piairmon
To check status of the service:
sudo systemctl status nanomesher_piairmon
You should see it active and running. PiAirMon should now auto start as a service after reboot.
To check historical data in the sqlite database
- Install sqlite3 if you have not already done so.
sudo apt-get install sqlite3
- open the database and run the sql queries
sqlite3 ~/Nanomesher_ProdBoard/database/weather.db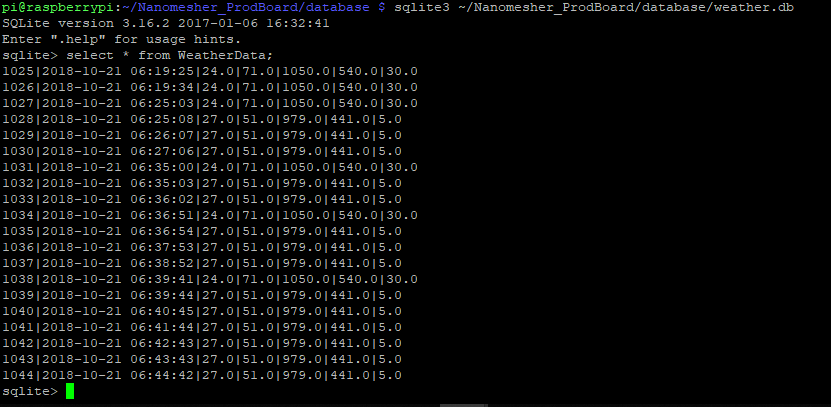
Alternatively, you can also transfer the weather.db in Nanomesher_ProdBoard/database/ to your computer to view.
To check log
nano ~/Nanomesher_ProdBoard/WeatherExample/piairmon.log
Multimedia use
You can re-purpose your system to be a Music Player or Video streamer.